Installation (v1)
10 February 2018 | 3030 views | Documentation v2
Pre-flight checks
1. Check that your webserver supports:
- PHP 7.2 or higher (the installer will not run without it).
- sqlite3 extension.
- PDO and pdo_sqlite extensions.
- gd extension.
PHP 7.2 will be the main issue, as it is still fairly recent and not all web hosts will have updated yet (but really, if your host isn't offering it then you should consider finding another one, or ask if they can upgrade it). The other dependencies are fairly standard.
Upload files
2. Upload the files from the installation package to your web root directory (the top level directory that can be accessed via the browser on your server). This is usually, but not always, called public_html or sometimes htdocs.
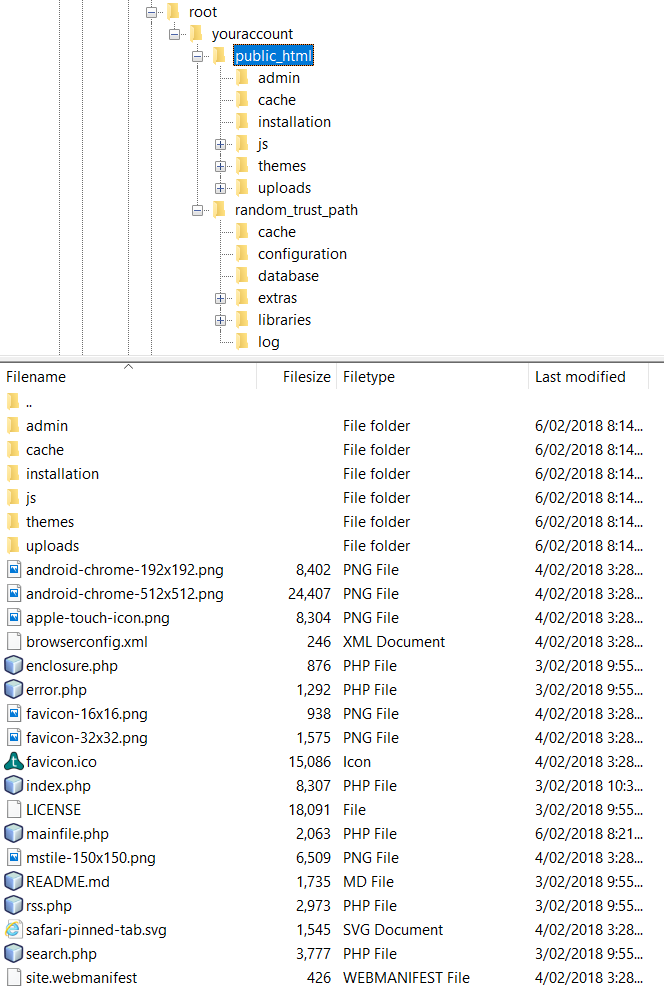
3. Move the trust_path directory outside of the web root, ie. to the next higher directory. This ensures that nobody can access these files (which include your database and configuration files) via a web browser. You may also wish to change the name of this directory to something unpredictable, so that attackers can't guess it. The directory structure on your webserver should now look something like this:
Set the paths
4. Open mainfile.php in your code editor. You need to specify the directory paths for the constants below. Make sure you end each path with a trailing slash. Upload the modified mainfile.php to your website root.
- TFISH_ROOT_PATH: The path to your web root directory, eg. /home/accountname/public_html/
- TFISH_TRUST_PATH: The path to your trust_path directory, eg. /home/accountname/random_trust_path/
- TFISH_URL: The URL of your site, with trailing slash eg: http://yoursite.com/ (use https:// if you have an SSL certificate installed).
////////////////////////////////////////////////////////////
////////// You must configure the following paths //////////
////////////////////////////////////////////////////////////
define("TFISH_ROOT_PATH", "/home/youraccount/public_html/");
define("TFISH_TRUST_PATH", "/home/youraccount/random_trust_path/");
define("TFISH_URL", "https://yoursite.com/");
////////////////////////////////////////////////////////////
//////////////////// End configuration /////////////////////
////////////////////////////////////////////////////////////
Install!
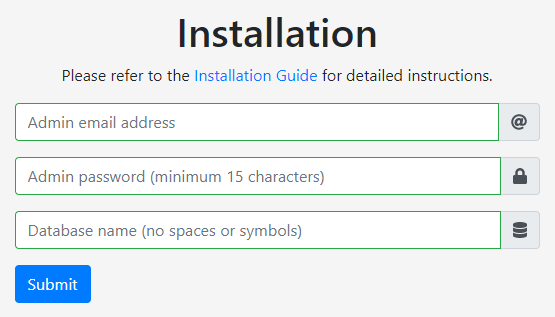
5. Open http://yoursite.com/installation/ in your browser (in Tuskfish 2, it is http://yoursite.com/install) and enter the following information:
- Admin email: This will be your user name for the site.
- Admin password: A minimum length of 15 characters is required (any shorter and the entire keyspace can be brute force searched).
- Database name: Only alphanumeric and underscore characters are allowed. Good practice is to use something unpredictable.
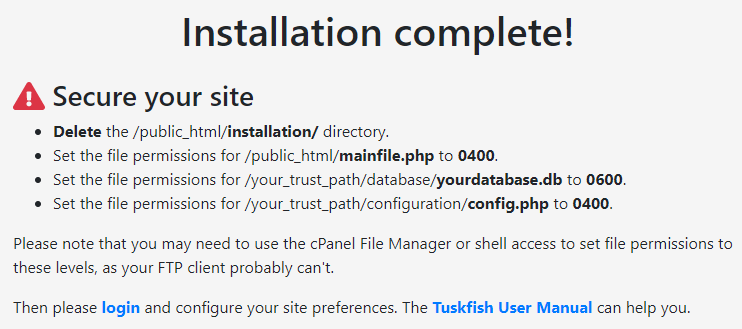
6. Submit the completed form and if everything goes well you will see an "Installation complete!" message and a link to your home page. If you see any error messages about being unable to find particular files then it is likely that you made a mistake in the directory paths when editing mainfile.php (refer to step 4).
Secure your site!
Please complete the installation process by securing your new website. Please note that this is mandatory and that your website is not secure until you do so. I strongly recommend that you run the site over an encrypted connection (https://) to protect your login credentials. You can get free SSL/TLS certificates from Let's Encrypt.
Copyright, all rights reserved.